Edge AI is revolutionizing industries by enabling real-time AI inference at the edge, reducing latency, bandwidth costs, and reliance on cloud processing. As AI becomes essential at the edge, organizations struggle with deploying and managing models across distributed environments with limited resources, diverse hardware, and intermittent connectivity. Gartner predicts that by 2029, at least 60% of edge deployments will use both predictive and generative AI, up from less than 5% in 2023. Traditional cloud tools fall short in supporting edge devices, but ZEDEDA’s edge-first platform, integrated with NVIDIA, simplifies AI orchestration, scaling from proof-of-concept to full production.
This blog explores how ZEDEDA’s edge computing platform combined with NVIDIA’s TAO Toolkit and the NVIDIA Triton Inference server provide an end-to-end workflow—from model development to deployment—on NVIDIA Jetson edge hardware platforms, using a process that involves these activities :
- Start with a pre-trained model from NVIDIA’s NGC catalog
- Retrain & optimize the model using the TAO Toolkit
- Convert to TensorRT for GPU acceleration on Jetson devices
- Deploy at scale using ZEDEDA’s edge orchestration platform
- Monitor inference workloads remotely using Grafana dashboards
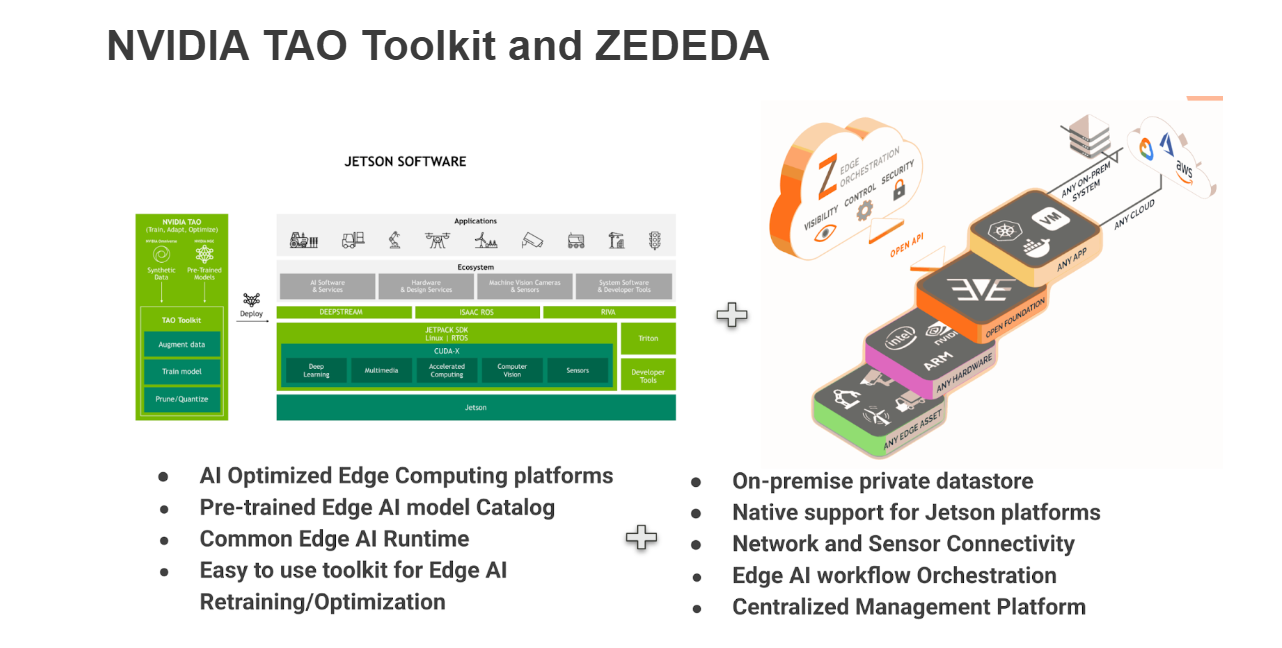
Edge AI deployment requires a robust and scalable workflow that supports model training, optimization, and deployment across heterogeneous hardware platforms. NVIDIA’s TAO (Train, Adapt, Optimize) Toolkit simplifies the AI model development process, while ZEDEDA provides secure, centralized deployment and monitoring.
Key Components
- NVIDIA Edge AI Ecosystem
- Optimized computing platforms like Jetson devices
- NGC (NVIDIA GPU Cloud) model catalog with pre-trained AI models
- AI runtime frameworks such as DeepStream, Triton Inference Server, and TensorRT
- TAO Toolkit for model adaptation, pruning, and optimization
- ZEDEDA
- Secure, remote edge device management
- Private data storage and application profiles
- Centralized AI model deployment using containerized workflows
- Native support for NVIDIA Jetson platforms and distributed inference
- Growing marketplace of commercial, open source, and private AI workloads
The Workflow: From Pre-trained Model to Edge Deployment
We demonstrate the end-to-end workflow using the DetectNet_V2 model from NGC Catalog as an example. The workflow is basically the same for any other model in the NGC Catalog, but with some minor changes that may be required in the training and dataset preparation steps.
Step 1: Set up your environment
Create the following directory structure and environment variables for working with the TAO toolkit:
USER_EXPERIMENT_DIR =~/workspace/tao-experiments/detectnet_v2

DATA_DOWNLOAD_DIR =~/workspace/tao-experiments/data

LOCAL_PROJECT_DIR" = "~/tao"

LOCAL_EXPERIMENT_DIR = $LOCAL_EXPERIMENT_DIR/detectnet_v2

LOCAL_DATA_DIR = $LOCAL_EXPERIMENT_DIR/data

SPECS_DIR = ~/workspace/tao-experiments/detectnet_v2/
For working with the DetectNet_V2 model, we would need the specification files for training, working with datasets, retraining, etc. Let’s download the specification files and keep them in the `SPECS_DIR` folder:
wget https://github.com/cshari-zededa/NVIDIA-TAO-ZEDEDA/releases/download/1.0/specs.tgz

tar -xvf specs.tgz -C $SPECS_DIR
Next, install NVIDIA TAO Toolkit by following the instructions on this page, depending on your environment:
https://docs.nvidia.com/tao/archive/5.3.0/text/tao_toolkit_quick_start_guide.html
Almost there! Before we begin downloading the datasets, we install NGC CLI for downloading pre-trained models from the NGC Catalog:
https://org.ngc.nvidia.com/setup/installers/cli
Step 2: Download dataset for model retraining
For DetectNet_V2 training, we take additional datasets from the KITTI Autonomous car driving dataset, and then convert the dataset into TF Records for feeding to the training command:
export URL_IMAGES="https://s3.eu-central-1.amazonaws.com/avg-kitti/data_object_image_2.zip"

wget $URL_IMAGES -O $LOCAL_DATA_DIR/data_object_image_2.zip

export URL_LABELS ="https://s3.eu-central-1.amazonaws.com/avg-kitti/data_object_label_2.zip"

wget $URL_LABELS -O $LOCAL_DATA_DIR/data_object_label_2.zip

unzip -u $LOCAL_DATA_DIR/data_object_image_2.zip -d $LOCAL_DATA_DI

unzip -u $LOCAL_DATA_DIR/data_object_label_2.zip -d $LOCAL_DATA_DIR#Use TAO Toolkit Convert command under detectnet_v2 to convert the dataset

tao model detectnet_v2 dataset_convert \-d $SPECS_DIR/detectnet_v2_tfrecords_kitti_trainval.txt \

-o $DATA_DOWNLOAD_DIR/tfrecords/kitti_trainval/kitti_trainval \

-r $USER_EXPERIMENT_DIR/
Step 3: Importing & Retraining an AI Model
Here we import the resnet18 version of the DetectNet_V2 model from the NGC Catalog using NGC CLI, and then start the retraining process with the KITTI dataset using the NVIDIA TAO toolkit. The output is going to be a .hd5 file saved in the directory experiment_dir_unpruned. We are assigning one GPU for the retraining process, but you can change this according to the number of GPUs you have on the training platform. The commands for the ngc download commandline and the tao training commandline are given below:
Code Snippet for Retraining:
# Download DetectNet_v2 model from NGC, stored as resnet18.hdf5
ngc registry model download-version nvidia/tao/pretrained_detectnet_v2:resnet18 \
                               --dest $LOCAL_EXPERIMENT_DIR/pretrained_resnet18


# Retrain with KITTI dataset
tao model detectnet_v2 train -e $SPECS_DIR/detectnet_v2_train_resnet18_kitti.txt \
                                 -r $USER_EXPERIMENT_DIR/experiment_dir_unpruned \
                                 -n resnet18_detector \
                                 --gpus 1
#After the completion, the trained model will be placed as resnet18_detector.hdf5 in

#$USER_EXPERIMENT_DIR/experiment_dir_unpruned/weights/resnet18_detector.hdf5
Step 4: Model Optimization – Pruning & Quantization
Edge devices have limited computational power compared to cloud GPUs. To ensure efficiency, we apply a model pruningtechnique, which significantly reduces model size while maintaining accuracy.
What is Model Pruning?
Model pruning is a technique used to reduce the size of a deep learning model by removing unimportant weights, neurons, or entire layers, without significantly affecting performance. This helps in:
- Reducing inference time (faster model execution)
- Lowering memory requirements
- Decreasing power consumption, especially for edge devices
Pruning is commonly used in computer vision models like DetectNet_v2, YOLO, SSD, etc.
Types of Model Pruning
- Weight Pruning – Removes individual weights with low magnitude
- Neuron Pruning – Eliminates entire neurons from a layer
- Channel/Filter Pruning – Removes entire convolutional filters
- Structured Pruning – Removes structured groups (e.g., full layers, blocks)
- Unstructured Pruning – Removes individual weights without any specific pattern
Here, for the DetectNet_v2 model we apply the structured pruning technique.
Code Snippet for Model Pruning:
export UNPRUNED_MODEL_PATH=$USER_EXPERIMENT_DIR/experiment_dir_unpruned/weights
export PRUNED_MODEL_PATH=$USER_EXPERIMENT_DIR/experiment_dir_pruned/
mkdir -p $PRUNED_MODEL_PATH

tao model detectnet_v2 prune \
          -m $UNPRUNED_MODEL_PATH/resnet18_detector.hdf5 \
          -o $PRUNED_MODEL_PATH/resnet18_nopool_bn_detectnet_v2_pruned.hdf5 \
           -eq union \
           -pth 0.0000052
Important Reminder: After pruning, it’s crucial to retrain the model to recover any lost accuracy. Once retraining is complete, head over to the model evaluation section below to compare its performance before and after pruning. This will help you fine-tune the pruning threshold for the best balance between efficiency and accuracy. For retraining the pruned model, use the following TAO command:
# Retraining using the pruned model as pretrained weights
!tao model detectnet_v2 train -e $SPECS_DIR/detectnet_v2_retrain_resnet18_kitti.txt \
                        -r $USER_EXPERIMENT_DIR/experiment_dir_retrain \
                        -n resnet18_detector_pruned \
                        --gpus 1
Trade-Off Considerations: One important tradeoff between model size and model accuracy. Typically, you only need to adjust the -pth (threshold) to balance accuracy and model size. A higher -pth results in a smaller model with faster inference but lower accuracy. The optimal threshold depends on the dataset. A starting point is 5.2e-6, but if retraining maintains good accuracy, you can increase this value to further reduce the model size. Otherwise, decrease it to improve accuracy.
Step 5: Model Evaluation
Before and after pruning, the following TAO command can be used to evaluate the model for its inference accuracy. For the DetectNet_V2 model, please use the specification file in the $SPEC_DIR path, downloaded from the ZEDEDA’s Edge AI Jupyter Notebook repository.
#Keep the retrained model at the below path

#export MODEL_PATH_FOR_EVAL=$USER_EXPERIMENT_DIR/experiment_dir_retrain/weights


tao model detectnet_v2 evaluate \

            -e $SPECS_DIR/detectnet_v2_retrain_resnet18_kitti.txt \
            -m $MODEL_PATH_FOR_EVAL/resnet18_detector_pruned.hdf5
Step 6: Converting the Model for Edge Deployment
Once retrained and optimized, the model is converted into an ONNX format. ONNX stands for Open Neural Network Exchange, which is the open format built to represent the machine learning models. HDF5 is The Hierarchical Data Format version 5 (HDF5), used by Keras to represent the machine learning models. TAO Toolkit has built in support for converting DetectNet_v2 model from .hd5 format(Keras) into .ONNX file, using tf2onnx package, which is given below:
Code Snippet for Model Conversion:
export INPUT_MODEL_PATH=$USER_EXPERIMENT_DIR/experiment_dir_unpruned/weights

export OUTPUT_MODEL_PATH=$USER_EXPERIMENT_DIR/experiment_dir_final

!tao model detectnet_v2 export \
                  -m $INPUT_MODEL_PATH/resnet18_detector.hdf5 \
                  -e $SPECS_DIR/detectnet_v2_train_resnet18_kitti.txt \
                  -o $OUTPUT_MODEL_PATH/resnet18_detector.onnx \
                  --onnx_route tf2onnx \
                  --gen_ds_config
Step 7: Converting ONNX file to TensorRT Engine for Jetson GPU
Once the model is exported in ONNX, we can use the NVIDIA Triton Inference Server to host the model for serving. Triton Inference Server is a common runtime implemented by NVIDIA to host AI models of different formats and perform inferencing with different models concurrently.
The ONNX model we’ve generated is not yet optimized for GPUs. To achieve faster inference, we need to convert it into the TensorRT engine format, which in turn uses CUDA(Compute Unified Device Architecture) to offload inference computations to the GPU instead of the CPU. This optimization significantly enhances efficiency and reduces inference time—an essential factor for time-sensitive Edge AI deployments where every millisecond counts.
ZEDEDA’s Edge AI SDK provides a convenient API to do this conversion, with a single python method that can be integrated with the Jupyter notebook. An example API call to do this with the ZEDEDA Edge AI SDK is given below:
from zededa_edge_ai_toolkit import ZededaTRTConverter


onnx_file_path = "/home/ubuntu/tao/detectnet_v2/experiment_dir_final/resnet18_detector.onnx"
ZededaTRTConverter(onnx_file_path, "model.plan")


#TensorRT engine file is model.plan file is saved in the current directory
Using ZEDEDA’s AI API, we seamlessly convert the ONNX model into a TensorRT engine, optimizing it specifically for Jetson devices.
Step 8: Prepare model repository for Triton Inference Server
Triton Inference Server is capable of working with a number of models, each with many versions at the same time. We are going to use the NVIDIA Triton Inference Server at the Edge AI model runtime, we need to prepare the model_repository as a OCI volume that can be attached to the Triton container. To make upgrading of the models easier, we are preparing model_repository as a separate OCI volume, so that we can independently upgrade either Triton Inference Server or the models with ZEDEDA, without affecting each other.
A sample python script is given to package the model file in a hierarchy suitable for use with Triton Inference Server:
import os
import subprocess
!rm -rf models
!mkdir -p models/peoplenet/1

!cp model.plan models/peoplenet/1/model.plan
!ls -ltr models

# Define parameters

model_repository_path = "models"

docker_image_name = "ngcmodels"|
# Step 1: Create a Dockerfile
dockerfile_content = f"""
FROM scratch
COPY models/ /models
"""
dockerfile_path = "./Dockerfile"
# Write Dockerfile

with open(dockerfile_path, "w") as f:

f.write(dockerfile_content)
# Step 3: Build the OCI Image
subprocess.run(["docker", "build", "-t", docker_image_name, "."], check=True)

#Push this docker to any OCI container registry of your choice
With this, we’ve successfully completed a critical milestone—building an Edge AI model tailored to the business use case. Now, let’s move forward. In the next section, we’ll dive into remote deployment and monitoring, leveraging Triton Inference Server and ZEDEDA to seamlessly scale this model across multiple edge devices.
Step 9: Deploying the AI Model at Scale with ZEDEDA
Once the optimized model is ready, ZEDEDA enables seamless remote deployment across a fleet of edge devices with just a few Python calls using the ZEDEDA Edge AI SDK.
As with any Edge AI use case, deploying the model alongside Triton Inference Server isn’t enough. We also need two additional components at each edge site:
Edge AI Business App
- Interfaces with external sensors and actuators for pre-processing and post-processing.
- Feeds the processed sensor data into Triton Inference Server for running AI inference.
Observability Agent for Triton Server (like Grafana Alloy)
- Collects performance metrics from Triton Inference Server.
- Periodically exports these metrics to a central dashboard for monitoring inference performance.
The picture below shows how these components are all related to each other and orchestrated by ZEDEDA with its specialized Edge AI SDK.

To simplify deployment, the ZEDEDA Edge AI SDK provides a unified packaging approach for these three components—Triton Server, the Edge AI Business App, and the Observability Agent—into a single profile called the Edge AI Application Profile.
This Edge AI Application Profile can be deployed to any number of edge devices directly from the ZEDEDA cloud. Devices are targeted using tags assigned during provisioning. For example, all Jetson devices can be tagged with edgeDeviceGroup:Jetsons, allowing deployment to all Jetson devices with a single API call using the ZEDEDA Edge AI SDK.
With this streamlined approach, scaling AI models across distributed edge infrastructure becomes faster, more efficient, and highly automated.
Here’s a sample profile definition for your reference:
from zededa_controller import ZededaController
import os
import json
zededa = ZededaController()
#Create Edge AI Application profile
profile_data = {
    "profile_name": "nvidia_triton_profile",  #Name of the Edge AI Profile
    "oci_triton_inference_server": "csharizededa/tritonserver:6.0", #Triton Server
    "oci_model_repository": "csharizededa/ngcmodels:1.0", #Model Repo for Triton Server
    "oci_prometheus_server": "csharizededa/tritonmetrics:2.0", #Observability Agent
    "oci_edge_ai_app": "csharizededa/tritondemo:2.0" #A Demo Edge AI Business App
}
profile = zededa.create_profile(profile_data)
all_profiles = zededa.get_profile()
print("All Profiles:", all_profiles)
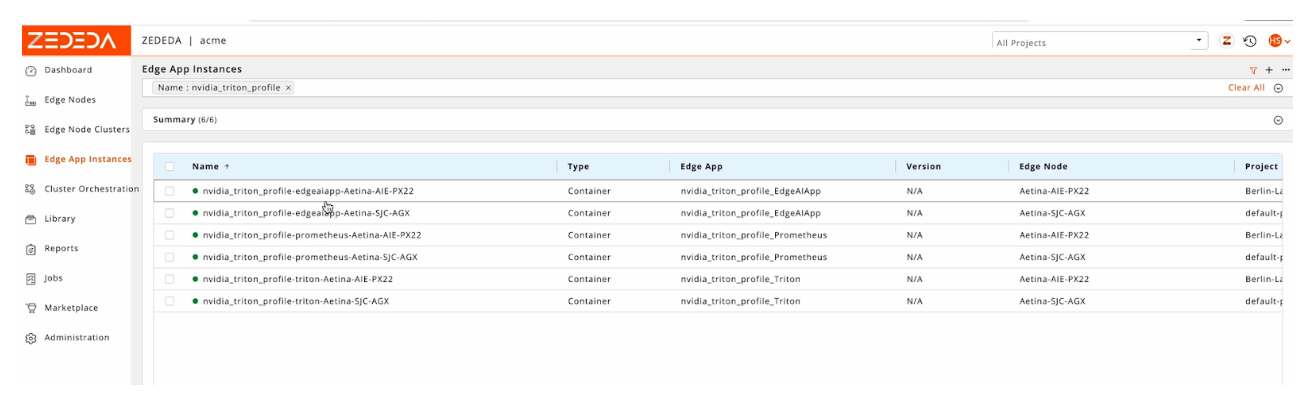
Creating an Edge AI profile streamlines the process of defining individual Edge Applications for each component, eliminating the need for manual configuration. Notably, Triton Inference Server is automatically assigned the GPU to maximize inference efficiency. Once the necessary internal resources are set up, ZEDEDA provides a comprehensive summary of the Edge AI profile creation, ensuring a seamless deployment experience:
Created Profile: {
    "application_bundles": {
        "edgeaiapp": {
            "bundle_name": "nvidia_triton_profile_EdgeAIApp",
            "bundle_uuid": "579873a1-1e43-434f-ab66-610400acf960"
        },
        "prometheus": {
            "bundle_name": "nvidia_triton_profile_Prometheus",
            "bundle_uuid": "84a7b860-8449-413c-9938-e5773b9edd91"
        },
        "triton": {
            "bundle_name": "nvidia_triton_profile_Triton",
            "bundle_uuid": "af8dd65d-ac02-4758-a1b0-cf82450404be"
        }
    },
    "id": "790d0c2c-8911-4f10-9b17-bf88616e7739",
    "images": {
        "oci_edge_ai_app": {
            "image_name": "nvidia_triton_profile_oci_edge_ai_app",
            "image_uuid": "6c71e870-2bdc-4a29-9998-f4136517d7a7"
        },
        "oci_model_repository": {
            "image_name": "nvidia_triton_profile_oci_model_repository",
            "image_uuid": "f154a226-6773-4fe9-8bfa-c9f63cef0bb3"
        },
        "oci_prometheus_server": {
            "image_name": "nvidia_triton_profile_oci_prometheus_server",
            "image_uuid": "fd5008d6-38ea-4e7f-bf75-bc546dd37e76"
        },
        "oci_triton_inference_server": {
            "image_name": "nvidia_triton_profile_oci_triton_inference_server",
            "image_uuid": "65102b0e-becd-4e7f-a042-ab3fb3c0b315"
        }
    },
    "oci_edge_ai_app": "csharizededa/tritondemo:2.0",
    "oci_model_repository": "csharizededa/ngcmodels:1.0",
    "oci_prometheus_server": "csharizededa/tritonmetrics:2.0",
    "oci_triton_inference_server": "csharizededa/tritonserver:6.0",
    "profile_name": "nvidia_triton_profile"
}
You can also view the application bundles created by the Edge AI profile from ZEDEDA’s Marketplace portal:

Step 10: Deploying Edge AI Application Profiles
Once the Edge AI Application Profile is created, deploying it across multiple edge devices becomes effortless with ZEDEDA. Using the ZEDEDA Edge AI SDK, this is achieved by creating a Profile Deployment resource.
Simply specify the profile name and a label/tag to identify the target edge devices, and ZEDEDA handles the rest—automatically selecting the devices that match the label and applying the profile to each one, seamlessly scaling the deployment.
As part of this process:
- Triton Inference Server is automatically assigned a GPU on each device to accelerate inference.
- ZEDEDA tags Triton Inference Metrics from the Observability Agent with device labels, making it easier to filter and analyze inference performance based on edge locations in the central metrics dashboard.
At the end of the deployment, ZEDEDA generates a detailed report, summarizing the number of devices matched and the application instances created for each, ensuring full visibility into the profile deployment, and easy co-relation later on in the ZEDEDA UI.
Below is an example of a profile deployment:
profile_deployment = zededa.create_profile_deployment(
             profile_name="nvidia_triton_profile",
             tag='"edgeDeviceGroup":"jetsons"'
)
print("Profile Deployment:", json.dumps(profile_deployment, indent=4, sort_keys=True))
The ZEDEDA UI can be used to view the progress of the Edge AI profile deployment, as shown below:
Step 11: Monitoring Edge AI Inference in Real Time
Monitoring inference performance metrics is critical after deploying Edge AI solutions across a fleet of devices. It ensures real-time visibility into model accuracy, latency, and resource utilization, helping to detect bottlenecks, optimize GPU allocation, and maintain consistent performance across diverse edge environments. Without continuous monitoring, issues like model drift, hardware failures, or degraded inference speed could go unnoticed, impacting decision-making and overall system reliability.
The Edge AI Observability Agent, included in the Edge AI Application Profile, can be configured to stream Triton Inference Metrics to any Prometheus endpoint of your choice. This enables real-time monitoring of inference performance, helping you track key metrics such as latency, throughput, and resource utilization.
Below is an example of a sample dashboard built using Triton Inference Metrics, providing actionable insights into model performance across your edge devices:

Key Performance Metrics Collected
NVIDIA Triton Inference Server exports an extensive list of metrics related to Inference execution, and labels them with model names and versions for easy reference in the Prometheus server. Some of the important metrics are:
- Inference request count & success rate – inference requests received by Triton server
- GPU utilization – GPU power consumption, Memory utilization
- Latency & execution times – Model execution latency, Inference execution time
For a comprehensive list of inference metrics available from Triton Inference Server, refer to the following link:
https://docs.nvidia.com/deeplearning/triton-inference-server/user-guide/docs/user_guide/metrics.html
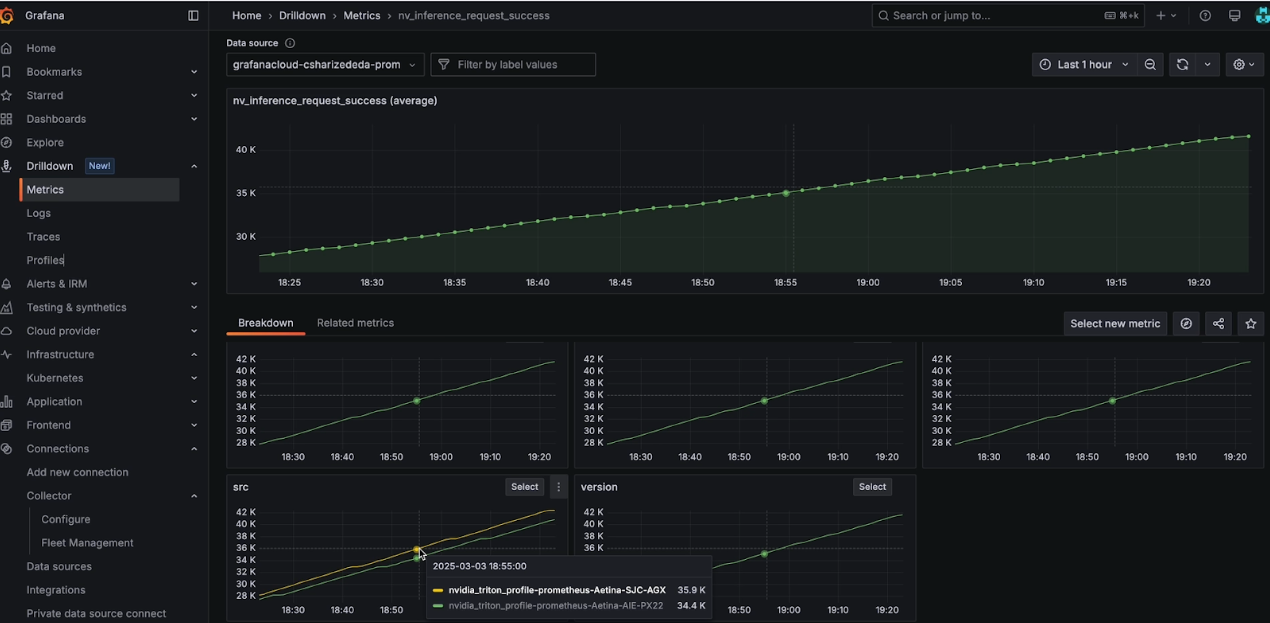
ZEDEDA Edge AI Orchestrator adds source labels automatically, so you can filter based on the src label to get per-edge site performance for any of the Triton metrics. As an example, the following screenshot shows how you can view nv_inference_request_success based on “src” label, which shows there are two Edge sites sending this metric, one with src as nvidia_triton_profile_prometheus_Aetina_SJC_AGX and the other with src as nvidia_triton_profile_prometheus_Aetina_AIE_PX22.
Key Takeaways
? Why This Matters: Edge AI deployments can now be automated, scalable, and optimized with ZEDEDA and NVIDIA’s TAO Toolkit, reducing operational overhead while ensuring low-latency inference at the edge.
?In this blog, we covered the following End-to-End Edge AI Model Workflow:
- Start with a pre-trained model from NVIDIA’s NGC catalog
- Retrain & optimize the model using the TAO Toolkit
- Convert to TensorRT for GPU acceleration on Jetson devices
- Deploy at scale using ZEDEDA’s Edge Orchestration Platform
- Monitor inference workloads remotely using Grafana dashboards
To get started, watch the demo walkthrough or explore the complete source for code snippets used in this blog on github.
Advancing the Future of Edge AI
ZEDEDA is continuously expanding its ecosystem and capabilities to simplify edge AI deployment. With an open architecture and a growing marketplace of commercial, open-source, and private workloads, ZEDEDA offers unmatched flexibility for deploying and managing edge AI while ensuring consistent security and orchestration. By partnering with industry leaders in edge AI, ZEDEDA empowers enterprises to focus on innovation instead of infrastructure complexity.
As edge AI adoption grows, the combination of NVIDIA TAO Toolkit and ZEDEDA’s edge computing platform provides a powerful solution for industries like: Manufacturing, Energy, Retail, Transportation, and Robotics.
Want to try it yourself? Reach out to ZEDEDA and NVIDIA to explore how you can build your own scalable edge AI solutions today.
ZEDEDA will showcase these capabilities at a panel discussion during NVIDIA GTC on March 18, from 6-9 pm, with the panel beginning at 7 pm. Learn more and register here.